The Beginning:
Hi there,
I recently merged all the repos (even express backend server code) into a single repository and wanted to share my learnings with code samples with you all...
Prerequisites: You should have coffee or tea or even beer in your vicinity.
Wait, Why Monorepo?
Monorepos are there in existence from many years - the reasons for any frontend/web team to opt for monorepo maybe different but boils down to mainly these 3 points:
- Re-usability of common code, configurations, components, etc.
- Ease of new project setup:
- [Basic configurations] Should have all the configs like eslint, prettier, .vscode settings, husky + lint-staged, tsconfig etc. should be done in under ~1 minute
- [Advance configurations] Tools like jest config, MSW and tailwindcss setup should be done in under ~5 minutes
- Better Developer Experience
- No explicit yarn linking of different packages OR switching between repos while doing development.
- Ease in team workflow: Merge all your changes related to your task in 1 go, instead of merging each PR for different repo separately (This maybe a real pain in your team too - let's say express backend code might merge before, causing the UI code to break for other team mates until that developer's UI code is also merged).
Aha! Monorepo makes sense. But how can I easily have a Monorepo setup?
I guess you would have all guessed from the title that this article is going to be about - Monorepo with turborepo
There are many tools available in the market, listing the most popular ones here:
- Bazel
- Nx
- Gradle
- Pants
- Lerna
- Turborepo
- Rush
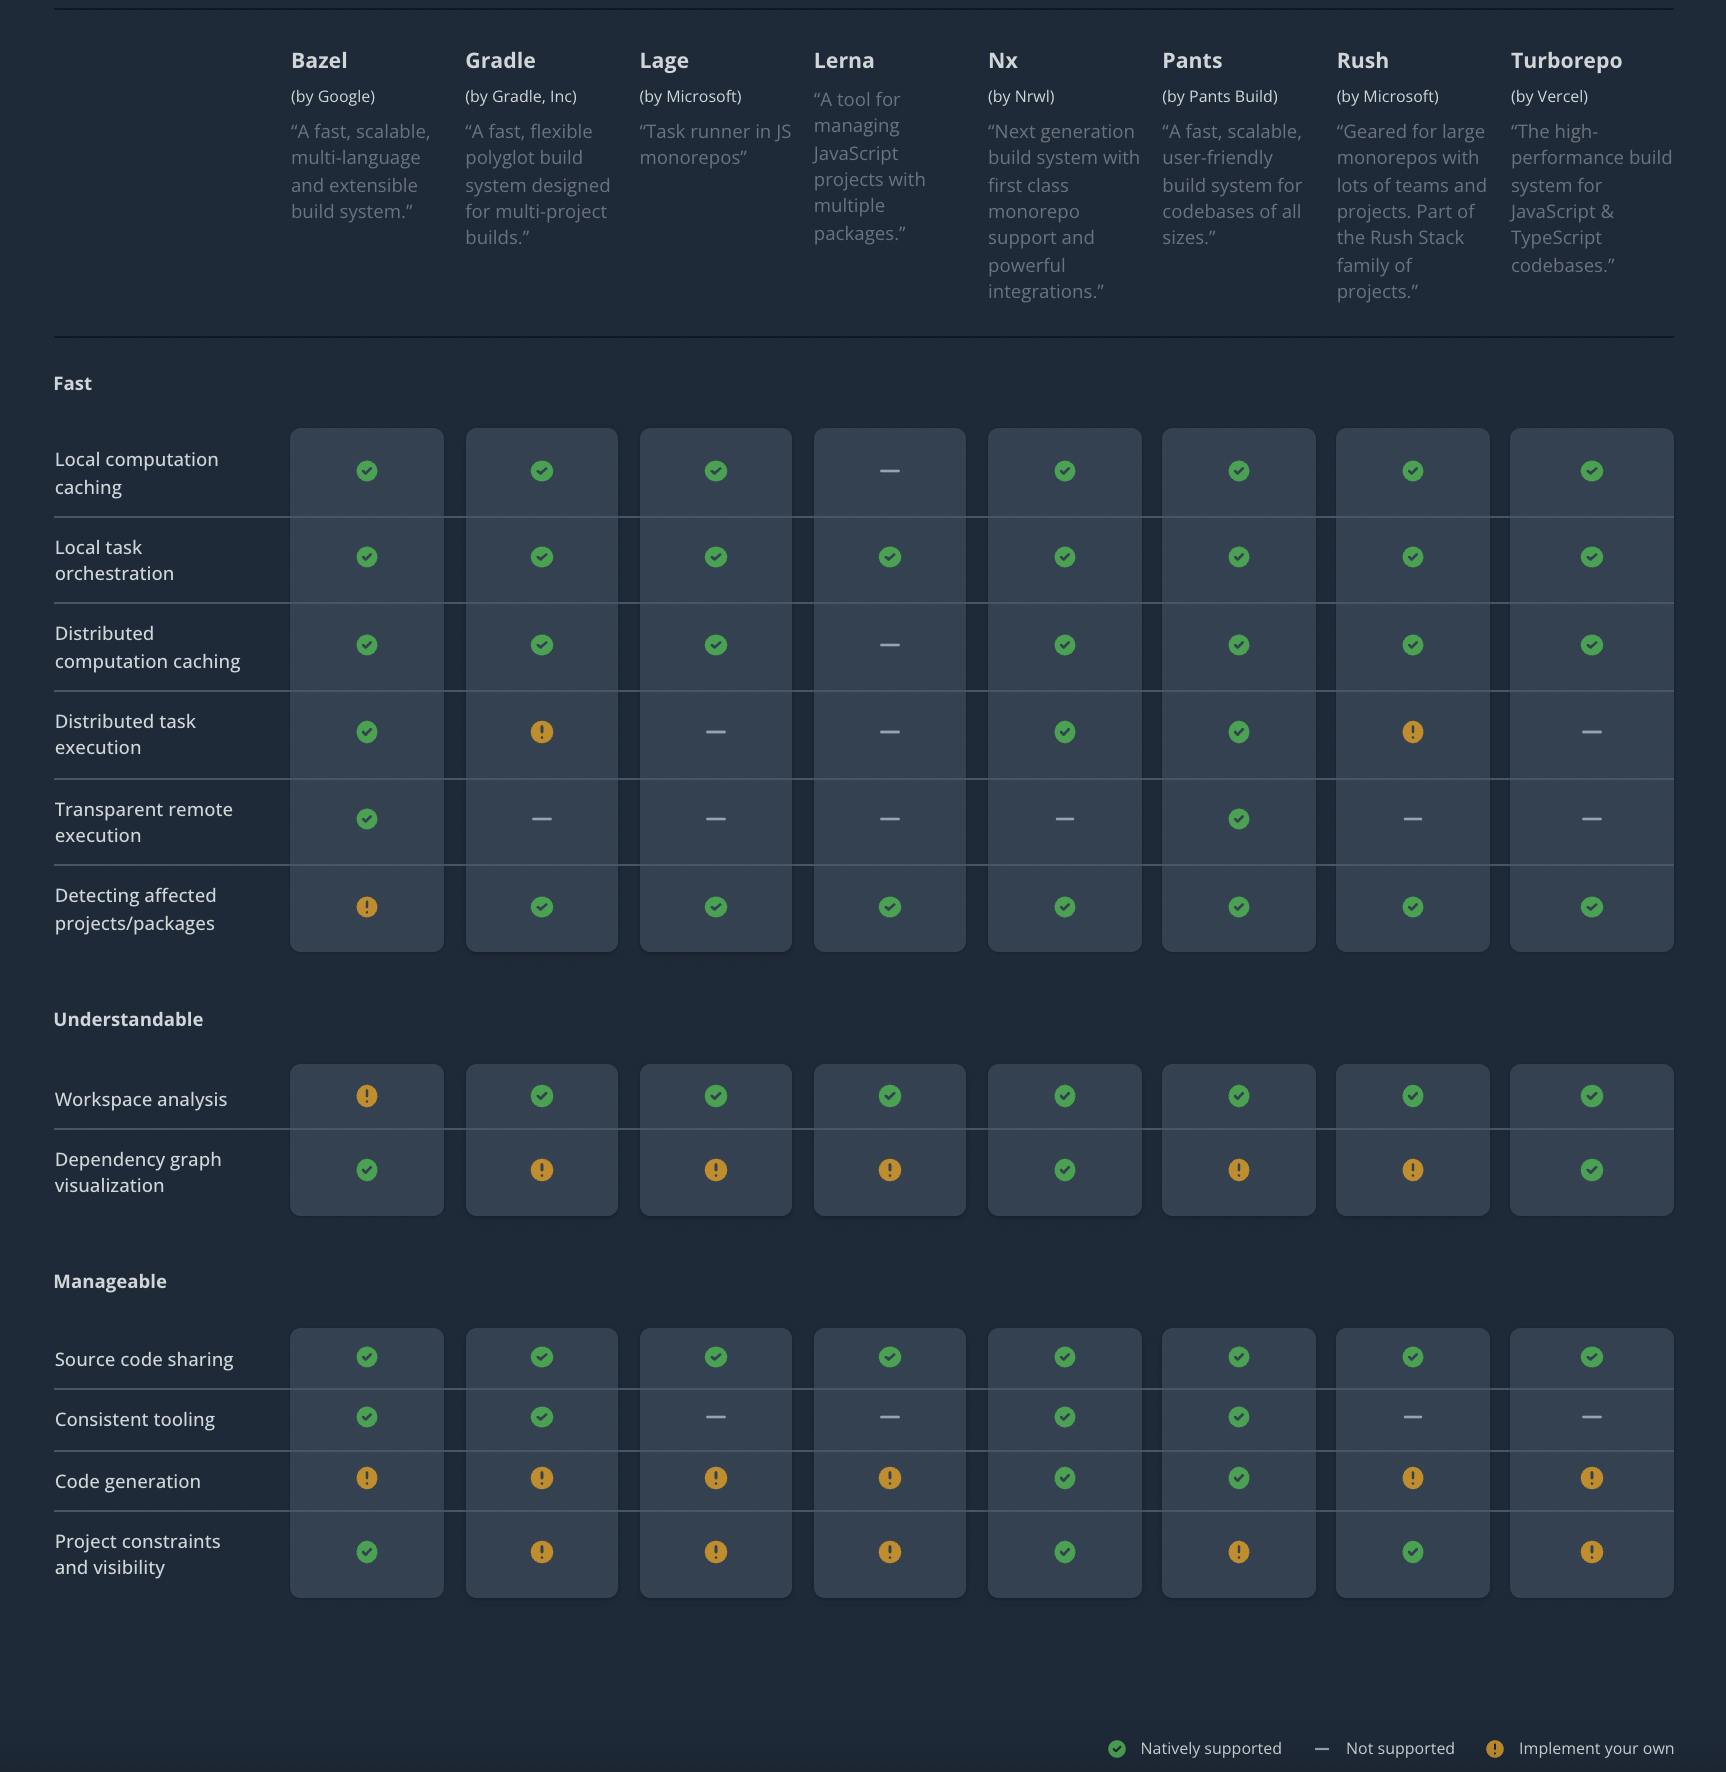
Yes there are many tools and you should choose the tool which best suits your requirement. Here's an image from this excellent website - monorepo.tools which extensively compares all these tools in depth.
Why Turborepo?
Main selling point is the integration - it is very simple and easy to understand especially for a new person joining your team - the various apps workflows and their inter-dependencies can be understood easily. Also Turborepo has a great community support and many amazing things seems to be lined up in this project by the Vercel team.

What more?
Turborepo easily finds the pruned subset of your monorepo to quickly build only your target web app without installing modules of other web apps.
Jump to last section to see how to make Dockerfile using turbo prune command.
More Control - You can only build the web app that has code changes without building any of it's dependent. Or you can choose to build the dependents as well. More details on
--no-depshere.
Okay, finally the setup:
We will take a look at the basic project structure first then cover following topics:
- Root package.json
- Adding Basic configurations: eslint, prettier, lint-staged + husky, tsconfig
- Adding Advance configurations: tailwindcss, jest
- turbo.json to add workflow settings
- Create Dockerfile using turbo prune
Basic project structure:
Let's have look at the folder structure:
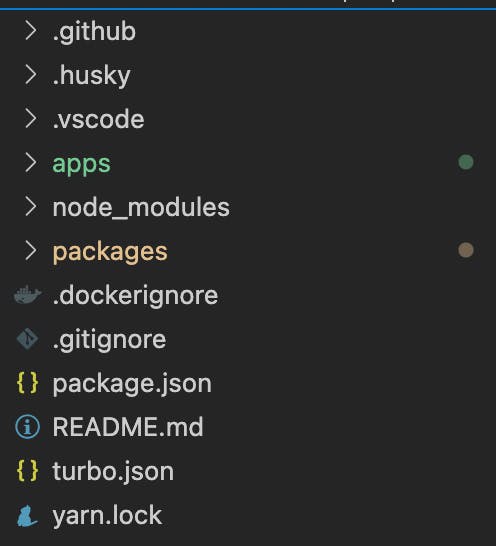
Let's take a closer look at /apps folder:
- It contains 2 apps: frontend-app-1 and frontend-app-2 powered by NextJS.

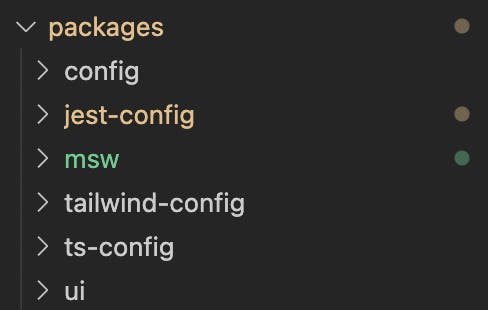
Let's take a closer look at /packages folder:
- It contains all the pluggable config packages that can be easily added to frontend-app-1 and frontend-app-2
1. Root package.json:
Root package.json mainly contains:
- workspaces: regex for yarn workspaces to find your various apps and packages
- Scripts to turbo charge your project, turbo will look for package.json of frontend-app-1 and frontend-app-2 and execute the scripts with same name in their package.json (if present) in the most optimised way possible.
...
  "workspaces": [
    "apps/*",
    "packages/*"
  ],
  "scripts": {
    "build": "turbo run build",
    "dev": "turbo run dev",
    "lint-staged": "turbo run lint-staged --concurrency=1",
    "test": "turbo run test --parallel",
    "test:cov": "turbo run test:cov --parallel",
    "tsc": "turbo run tsc --parallel",
    "start:prod": "turbo run start:prod",
  },
...
2. Adding Basic configurations:
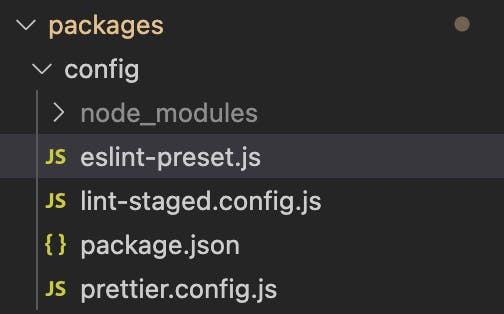
- Create a
packages/configfolder, which will have configs for eslint, lint-staged and prettier - The
packages/config/package.jsonis required to make it a package which can be added to package.json's of frontend-app-1 and frontend-app-2 packages/config/package.jsonfile looks like:
{
  "name": "config",
  "version": "0.0.0",
  "main": "index.js",
  "license": "MIT",
  "dependencies": {
    "@typescript-eslint/eslint-plugin": "^5.25.0",
    "eslint": "^8.15.0",
    "eslint-config-next": "^11.1.2",
    "eslint-config-prettier": "^8.3.0",
    "eslint-plugin-prettier": "^4.0.0",
    "prettier": "^2.4.1",
    "lint-staged": "^11.2.0",
    "husky": "^7.0.2",
    "path": "^0.12.7"
  }
}
packages/config/eslint-preset.jsfile looks like:
module.exports = {
  extends: [
    'next',
    'next/core-web-vitals',
    'plugin:@typescript-eslint/recommended',
    'prettier',
  ],
  plugins: ['@typescript-eslint'],
  rules: {
    'prefer-const': 'error',
    '@typescript-eslint/ban-ts-comment': 'off',
    '@typescript-eslint/ban-types': 'warn',
    'react/display-name': 'off',
    '@typescript-eslint/no-var-requires': 'off',
    'no-console': 'error',
    '@typescript-eslint/no-unused-vars': 'error',
  },
};
- Finally, we have our first independent package ready, let's add config package to package.json's of frontend-app-1 and frontend-app-2
- Add following line to
apps/frontend-app-1/package.jsonandapps/frontend-app-2/package.json:
"devDependencies": {
    "config": "*",
     ...
}
NOTE 1: yarn workplaces has a concept of hoisting, where common packages between 2 sibling apps are hoisted to their parent's node_module.
NOTE 2: when searching for a package in a app, first app's own node_module is searched then it's parent, then parent's parent and so on..
- Last but not the least, let's make
.eslintrc.jsin frontend-app-1 and frontend-app-2 with following code:
module.exports = require("config/eslint-preset");
lint-staged and prettier setup can be done exactly the same way !!
3. Advance configurations:
- Let's start with adding tailwindcss to both frontend apps:
- Step 1 is to create a new package under
/packagesfolder calledtailwind-config - Let's add
tailwind.config.js,postcss.config.jsand styles folder (see tailwind setup docs for more details) intailwind-configfolder - Create a package.json in
packages/tailwind-config:
{
  "name": "tailwind-config",
  "version": "0.0.0",
  "main": "index.js",
  "license": "MIT",
  "files": [
    "tailwind.config.js",
    "postcss.config.js"
  ]
}
- Add tailwind to root
package.jsonas tailwind is used by both frontend apps:
  "devDependencies": {
    "postcss": "^8.4.5",
    "postcss-import": "^14.0.2",
    "postcss-nested": "^5.0.6",
    "tailwindcss": "^3.0.2"
}
- You are all set now to add tailwind to your projects now !!
- Add following code to
apps/frontend-app-1/package.jsonandapps/frontend-app-2/package.json:
  "devDependencies": {
    "tailwind-config": "*"
}
- Create and add following code to
apps/frontend-app-1/tailwind.config.jsandapps/frontend-app-2/tailwind.config.js:
module.exports = require('tailwind-config/tailwind.config');
- Create and add following code to
apps/frontend-app-1/postcss.config.jsandapps/frontend-app-2/postcss.config.js:
module.exports = require("tailwind-config/postcss.config");
- Add Tailwind styles in
apps/frontend-app-1/styles/index.cssandapps/frontend-app-2/styles/index.css:
@import 'tailwind-config/styles/index.css';
That's it - now both frontend apps are powered by tailwind css.
NOTE: TailwindCSS autosuggestion will not work now as there are multiple
tailwind.config.jsfiles in the repo. To make it work in VS code editor, add these lines to.vscode/settings.json:
  "editor.quickSuggestions": {
    "strings": true
  },
  "tailwindCSS.experimental.configFile": {
    "packages/tailwind-config/tailwind.config.js": "**"
  }
4. Time to turbocharge via turbo.json file:
- This file is used by Turborepo to create a pipeline.
Depending upon your need, you can define the dependency graph of your monorep like what package to build first, what package server to start first OR what task to execute inside a package and it's dependent. Example:
buildtask in your package may depend ontest,tscandformatting/prettiertasks. Another Example: you may want todeployyourapp-1first then onlydeployyourapp-2.Turbo interprets this configuration to optimally schedule, execute, and cache the outputs of each of the package.json scripts defined in your workspaces. More here.
{
  "pipeline": {
    "build": {
      "dependsOn": ["^build"],
      "outputs": [".next/**", "dist/**"],
      "cache": true
    },
    "lint-staged": {
      "outputs": [],
      "cache": false
    },
    "frontend-app-1#build": {
      "dependsOn": ["frontend-app-2#build"],
      "outputs": []
    },
    "dev": {
      "cache": false
    },
    "test:cov": {
      "outputs": []
    },
    "start:prod": {
      "outputs": []
    }
  }
}
See Caching in Action:
- Build you project once via
yarn build:
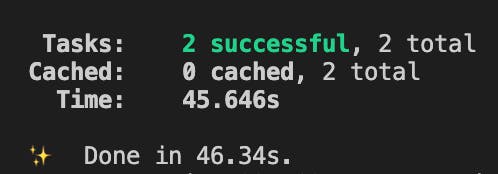
- Build you project the second time (with no code changes after step1):

Dockerfile with turbo prune:
Prerequisite: Refill your tea/coffee/beer glasses if empty
Now the most interesting part - how do we prune all the unwanted packages and keep which is only relevant to the target app - let's say frontend-app-1?
Here's the Dockerfile in action, we will go through each stage in detail:
# Stage 1
FROM node:16-alpine AS deps
WORKDIR /app
RUN yarn global add turbo@1.2.9
COPY . ./
RUN turbo prune --scope=frontend-app-1 --docker

# Stage 2
FROM node:16-alpine AS installer
WORKDIR /app
COPY --from=deps /app/out/json/ .
COPY --from=deps /app/out/yarn.lock ./yarn.lock
RUN yarn install --frozen-lockfile

# Stage 3
FROM node:16-alpine AS sourcer
WORKDIR /app
ENV NODE_ENV production
COPY --from=installer /app/ .
COPY --from=deps /app/out/full/ .
RUN yarn turbo run build --scope=frontend-app-1 --include-dependencies --no-deps

# Stage 4
FROM node:16-alpine AS final
WORKDIR /app
ENV NODE_ENV production
RUN addgroup -g 1001 -S nodejs
RUN adduser -S nextjs -u 1001
COPY --from=sourcer /app/apps/frontend-app-1/next.config.js ./
COPY --from=sourcer /app/apps/frontend-app-1/.env.production ./.env.production
COPY --from=sourcer /app/apps/frontend-app-1/public ./public
COPY --from=sourcer /app/apps/frontend-app-1/images ./images
COPY --from=sourcer /app/packages ./packages
COPY --from=sourcer --chown=nextjs:nodejs /app/apps/frontend-app-1/.next ./.next
COPY --from=sourcer /app/node_modules ./node_modules

USER nextjs
EXPOSE 3000
ENV PORT 3000
CMD ["node_modules/.bin/next", "start"]
Stage-1
- This stage globally installs
turboand using it's prune command - prunes all unwanted packages and outputs a subset of your monorepo with only frontend-app-1 and it's dependent packages!
Example of pruned monorepo:

out/json folder looks like:
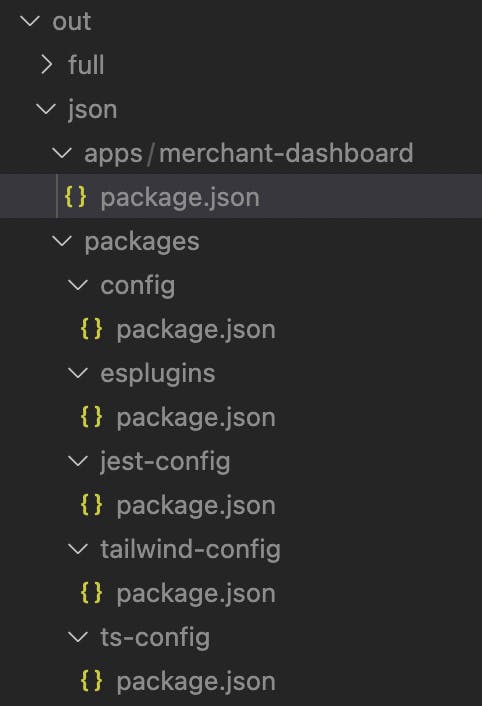
out/fullcontains the same structure asout/jsonfolder but with full code !!
Stage-2
- This stage copies only the content of
out/jsonfolder with newly generated prunedyarn.lockand doesyarn install. - As package.json does not changes frequently, it makes more sense to copy only the
out/jsonfolder which has only package.json ofappsandpackagesfolder. This stage is then cached and will only re-run freshly if any of the package.json is changed. - If instead you copy
out/fullfolder, then this stage will be executed everytime (as your code files will have new changes).Each command that is found in a Dockerfile creates a new layer. Each layer contains the filesystem changes to the image for the state before the execution of the command and the state after the execution of the command. If the file system changes are present then cached layer is ignored!
Stage-3
- Now from stage-2, you got your
node_modulesrequired for building your app frontend-app-1 - Copy the
node_modulesfrom stage-2 and the full code of your app from stage-1, and finally runturbo buildto build your app.
Stage-4
- Here we are mainly copying the files relevant for running the server
- This is also done so that the docker image size is less
Thanks for reading !!
Alright! You have reached the end of this article. If you liked this article, kindly give likes and comment the best part you liked about this article.

